Showing posts with label Breads/Biscuits/Muffins. Show all posts

Heavenly Pecan Pancakes (SF, GF, and GAPS approved)

|
I know a little while back I posted the Starch free, Gluten Free, Candida approved and GAPS approved Almond Pancakes, they were a hit for awhile. N and J were way crazy about them, and I thought they passed as a substitute, but they were definitely a substitute.

After my experiments with Almond/pecan bread I decided to give the pecans a chance as pancakes. I noticed that the pecan bread had a much smoother texture, it wasn't nearly as mealy as the almond counterpart, and since I wasn't a fan of the mealiness of the almond pancakes, I was thinking this might be my solution!

So, I made a batch of these yesterday for lunch, and I have to say, I think I could never eat a flour pancake again and be satisfied! They are completely fluffy, and not mealy at all! Their flavor can't be beat, and when topped with coconut honey, I think I could eat the whole batch myself!

Besides being tasty, they get many awesome substances into your diet! Pecans are known for their oleic acid content, also found in the olive, and this acid has been shown to reduce the risk of breast cancer, and in combination with their other fats help lower "bad" cholesterol levels. Now, we know sugars and starches are what cause high cholesterol to begin with, but why not toss in some nuts to help your body rid itself of the LDL's floating around! They are also touted as an awesome source of rich anti-oxidents as well! Don't forget you are getting all your protein in as well. So, you are doing your body a favor by eating up these amazing little pancakes! Leave the caking to your intestine starches out, and give these babies a try!

They are rather filling, so the recipe below will probably accommodate up to 3 or 4 people. You know your appetites better than I do. In our house, we could have had another person eat, as we had 3 leftover...and 3 or 4 is probably all one person could handle as they are pretty rich.

Recipe:
2 cups Crispy Pecans (measured out dry and whole!)
1/4 cup coconut milk (almond milk, cream, yoghurt, kefir)
1/2 tsp salt
1 tbsp honey (if allowed you are allowed)
4 eggs
1 1/2- 3 tsp cinnamon (depending on preference, we like alot!)
1 Tbsp vanilla extract (omit if not allowed)
Fresh or frozen berries or fruit of choice!


So, this is pretty similar to the almond recipe...take the 2 cups of pecans and place them in your food processor. process until all the pecans are tiny crumbles, and starting to collect as paste along the bottom of the processor. Don't process all into a paste. I find this makes a denser cake. Once processed, add the eggs and continue to process until bulk has increased and the pecans seem to be pulverized. Add the "milk" of choice and honey while the processor is going...also add the vanilla, cinnamon, and salt. Once all ingredients are combined well. Shut off the processor. The batter should be pourable..so if a little more "milk" is necessary go for it... (I have needed to add 1 more tbsp from time to time. It seems if my pecans still have a little retained moisture from the drying process they don't need it, and if they are completely crispity, crunchity they do)

If adding in fruit, transfer batter to a bowl and fold in the fruit of choice. If you are adding bananas, you can process those into the batter, or add as chunks. Heat a cast iron griddle or skillet and do a "oil" cleaning* to the skillet prior to your first cake with coconut oil. Once the skillet is hot, but not smoking, add the batter in 3 inch or 4 inch rounds. We tend to like big pancakes here, so I make 6-8 in rounds...but whatever floats your boat! These hold together much better than the almond ones so, you can make larger cakes if you so desire! When bubbly and partially dry on the edges flip and finish them off.

Enjoy these guys with plenty of fresh maple or berry syrup, or honey coconut spread! We can't have syrup so I mixed up the honey coconut spread and it was divine!


Honey coconut spread:

4 Tbsp coconut Oil
2 Tbsp honey

mix until well combined and spread on or pour on depending on the temperature of the coconut oil! This is also amazing in the freezer with cinnamon on top for a cool after dinner treat in the summer...plus it is a great way to get more coconut into your diet!


*
Oil cleaning consists of heating the skillet until a moderate heat, and than taking a TBSP of coconut, lard, or butter and rubbing the skillet until it appears a nice coating has been achieved. I do this prior to all pancake making...it also allowing for a more even browning on delicate items such as these. I find "frying" pancakes less desirable...but if you are into the fry cake flavor go for it! I prefer to pour on the fat after they have an even browning! :)

Give them a go! Let me know your modifications!

Nut Free/Dairy free Flat Bread or tortillas!

|
So, I stumbled upon this recipe at Pecan Bread. I have to say, we had the flat bread tonight with our hamburgers and both J and I were amazed at how good is actually did taste. N liked that he could "roll" it up and hid beans in it! I am shocked at when you eat this with meat or some other filling how the brain really processes it like bread!

These would make great "roll up" finger sandwiches, tortilla shells, or "crepes" for sandwich fillings.


Overall, they don't take too long to prepare, probably an hour start to finish...which when you consider the time it takes to make bread...this is nothing!

The trick is to make sure your egg whites are beaten until very stiff and the pureed veggies have all excess water removed. I simply boiled some carrots and beans together until soft, drained all the water, pureed them with my hand-held blender. The result was very thick! Perfect for this recipe.


Recipe:

1/3 cup pureed veggies (a combination of carrots, green beans, cauliflower, or squash, or just pick one of them)

6 Egg Whites
4 Egg Yolk
2 Tsp salt or seasoned salt. ( I like the "sugar free" season salt...I will post a recipe.)

If you don't have left over cooked veggies, than peel and cut some carrots and add green beans to the boiling water. Drain water and puree with a hand-held blender. Place egg whites in the bowl of a stand mixer and beat on high with the salt until stiff peaks form.
Blend the egg yolks and veggies together until liquid.

Carefully fold in the veggie mixture with the egg whites until blended.

Pre-heat the oven to 300 degrees.


Put batter on a sil-pat on a cookie sheet either spread through the whole thing or drop and slightly flatten in circles if using for buns or tortilla substitute. I would suggest potentially spreading the batter between 2 sheets if doing just the flat bread. The recipe makes
aprox. 22 "bun" sized rounds. (I recently tried this on parchment paper and not the sil-pat and it was a disaster...so I recommend the silpat. I am going to try it on a well greased sheet next, I will let you know how it turns out!)

Place in the oven for 30 minutes until lightly browned. If stacking pans, rotate mid-way through cooking.


We are really excited about these! Give them a try! Let me know what you think... It can't get any better, eggs and hidden veggies:)

Coconut Squash Muffins (Gluten Free/grain free)

|
A new variation, I like the consistency of these way better than the Nutty Squash ones, but the flavors are equal!

N and J both enjoyed them greatly...and if you aren't on a Candida or another special diet, I would add 2-4 Tbsp succant, honey, or maple syrup! I also dry roasted the squash this time and I found the muffins were way less wet! So, to dry roast your squash, cut the bulb off of a butter nut squash or use an acorn squash. Cut them in half and remove the seeds. Place in an oven-proof dish and set the oven to 250-300 degrees. Roast
flesh side up for 30 minutes than turn the oven off. Remove from oven when flesh is soft. This stops the squash from getting excessively moist!

1 Cup dry roasted butter nut squash
1 cup finely shredded coconut flakes (unsweeted, un-sulphured.)
2 Tbsp Coconut oil
4 Eggs
2 TBSP freshly ground flax seeds (optional)
2 Tbsp or more of cinnamon
1-2 Tbsp of homemade vanilla extract
(2-4 TBSP of a sweetener if allowed)

Pre-heat the oven to 350 degrees. Butter or Oil an 8x8 pan or muffin tins. (I personally hate muffin tins...I just find them a pain, so my family has gotten used to "cut" muffins from a cake pan!) Combine the squash and coconut shreds in the food processor or blender, blend until combined. Add the oil, flax, cinnamon, vanilla and eggs. Process again until well blended. Place batter in the buttered pan or tins. Place in the oven for 30-40 minutes until lightly browned ontop and a toothpick comes out clean. If you remove from the oven to soon, the muffins will shrink and get compacted. When they are cooked all the way through they will retain their shape!

Happy eating!

Squashy Nutty Muffins/bread

|
These are a nice substitute when you are avoiding grains or if you are trying to get more protein and veggies into your or your kids diet. They aren't the best things on the face of the planet, but they are a good supplement. I would highly recommend adding some honey or maple syrup...maybe 2 TBSP if you aren't avoiding Sugar than I think these would be awesome! They taste like a pumpkin pie bar minus the sweetness!

2 Cups cooked and cooled squash (aprox: 1 acorn, or 1/2 butternut)
1/2 cup crispy pecans
1/2 cup crispy almonds
4 eggs
1 Tbsp Coconut Oil
1 tbsp vanilla extract
2 Tbsp Cinnamon
1/4 Tsp Ginger
1/8 Tsp Ground Cloves
2-4 TBSP maple syrup/succant/honey (optional)

Place the Almonds and Pecans in a food processor or blender and process until it is a fine meal. Add the squash oil and spices. Process until blended. Add the eggs last and blend until combined.

Preheat oven to 300 degrees. Place batter either in mini muffin pans, muffin pans or a square cake pan. Oil the pan first! Bake for 30-40 minutes until the muffins pull away from the side of the tins or the pan. A toothpick inserted into the muffins should come out clean when inserted. The top should also brown a bit.

N really enjoyed them and did J. We all agreed they could use some honey...but they were a nice addition to our chicken soup dinner!

let me know what you think! Sorry no photo now, I will take one next time we make them. They were gone to quick to grab a photo!

Bread Glorious Bread...

|
I recently came to the conclusion just a week of 2 ago, that N will quickly be 2 and 1/2 and he has never tasted the goodness of a sandwich! I have tried so hard to find a way to adapt a recipe to a "starchless" "glutenless" bread, but really haven't had much success...until now.

I got a call from J saying we were going to have a family outing...which we all love, but my first
thought was "uh oh-what am I going to bring for Noah?" I didn't have any "travel" food ready. I did a quick search online, and quickly found one of my new favorite blogs, cheeseslave (She is on the blog roll list and the picture is hers.) She has an amazing recipe for Almond bread.

I am constantly amazed at how one can use almonds to replace starch. I have had lots of success with Almonds in place of wheat flour...pancakes is one.

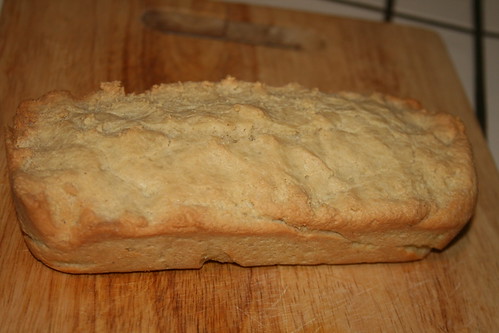
We gave it a go, and I love it, J loves it, and most importantly N loves it! And I am happy to say the little man got his first taste of a sandwich, a grilled cheese one at that! I feel as though I have had a great kitchen success this week!

I know you are all probably dying for the recipe so....

2 1/2 cup whole crispy almonds (or crispy pecans) (recipe in Nourishing traditions CB)
1/4 cup butter (coconut oil, or lard,
homemade yogurt or creme fraiche)
3 eggs
1 Tsp salt

Preheat oven to 300 degrees.

Measure nuts whole and place in a food processor or blender (I like the blender better for getting more of a fine meal) When almonds are pretty much pulverized remove from chopper of choice and place in a bowl. Add the eggs, and fat of choice and mix until well blended. Put "dough" (it will look much more like "sweet bread" recipes in consistency) in a small bread pan and bake for 40-60 minutes until a tooth pick comes out clean.

You can also buy almond meal at the store. You still use 2 1/2 cups, and soak this overnight in yogurt/buttermilk/kefir covered to remove the phytic acid and than proceed with recipe as noted above.
Let it rest for at least 10 minutes before using a butter knife to remove it from the pan.

We have used this for traditional sandwiches and also some french toast today. I wish I had taken pictures.

This recipe excits me for so many reasons, it is GAPS friendly, and yeast friendly, starchless, and full of protein. All and all, I am yet to find downers. :)

I will warn it sticks together really well, but the texture is not exactly like bread...it is a little more dense...kind of like a sweet bread. :) Enjoy!

Side note: just did this with pecans and added cinnamon, it is denser, but good. If you are looking for sandwich bread...definitely go with the almond!

Cinnamon Scones (with or without coconut)

|
Okay, So these are definitely not an everyday sort of thing, but they truly are fabulous for special treats! J loves them, as does anyone else that I have ever made them for. They are part of my recipe collection that I used to make for the local sandwich shoppe. They are versatile, add raisins, or cranberries or blueberries if you would like. Just omit the cinnamon and coconut!

1 3/4 cups Spring whole wheat flour (or white whole wheat flour) I use Montana mills
1 Tbsp Homemade Baking powder
1/4 tsp salt
1/4 cup succanant
3 Tbsp cinnamon
1 cup shredded coconut
1/2 cup coconut oil or 1/4 cup butter and 1/4 cup coconut oil melted on the stove
add to the oil 2 tsp vanilla extract
3/4 cup first pressed full fat coconut milk (I use Thai kitchen, the red label)

I have on hand some extra flower in case the batter is too sticky (1/4 cup at most) Sometimes just 2 Tbsps are needed for cutting. If you don't like coconut, omit the shredded coconut, use all butter, and add 1/4 cup flour to the recipe.

Combine all the dry ingredients, including the coconut in a bag and shake well to combine. Transfer to a bowl and add the melted fat. Cut in to the mixture is crumbly, then add in the coconut milk. The mixture should be moist, but not overly sticky. Transfer mixture onto a cutting board (if the mixture is sticky, add 1-2 tbsp of flour on the cutting board and another 1-2 tbsp flour on the top of the mixture once on the cutter board and fold in) Make a circle, about 9-10 inches in diameter and cut into pizza triangles. Transfer triangles onto a greased baking sheet or ungreased sil-pat and bake in a pre-heated 425 degree oven for 10-15 minutes.

Top with a glaze.

Glaze recipe:
1 cup powdered sugar (powdered evaporated cane juice crystals)
1 tsp vanilla extract
2-4 Tbsp coconut milk

Mix above ingredients together until a dripable consistency is reached. Drizzle onto of partially cooled scones!

Millet Drop Biscuits

|
We just had these tonight with our soup, and N and J both thought they passed the test....okay, well n chowed down on 2 huge biscuits and wanted a third. J thought they were a good substitute! I will make one note. I used store purchased millet flour for these, simply b/c I had it and didn't feel like grinding my own, and I have to say I thought the taste of the flour wasn't nearly as satisfying. I highly, highly recommend grinding your own millet!

So here it is. Thank you to Nourishing Gourmet for the start to this process:
2 cups millet flour
3 tsp homemade baking powder
1 tbsp sucanant (optional)
1 tsp salt (or 1/2 tsp if using salted butter)
8 Tbsp butter cut into small cubes (salted or not, I used salted)
3/4 cup buttermilk or yogurt (used yogurt, they rose beautifully, and held their texture)
2 eggs beaten into the yogurt or butter milk

Start by grinding your own millet in a blender if need be. For this you would simply place 2 cups of millet in a blender and turn it on liquefy for about a 1/2 hour, or until a fine flour consistency.

Take the 2 cups of millet and mix them thoroughly with the baking powder and salt. When well combined cut in butter. I used a pastry cutter, Nourishing Gourmet says you can use your fingers....or you could used a fork and a knife. A pastry cutter isn't too expense and it is a great purchase for baking. When the batter looks like course crumbles stir in your dairy/egg blend. The mixture will be a little wetter than traditional biscuit dough, but still firm enough to drop by the spoonful onto a greased baking sheet or a sil-pat.

Place in a 425 degree oven for 10-15 minutes. Remove from the pan promptly and place on a cooling rack or eat them! :) I didn't have any problems with them breaking or being crumbly, but Nourishing Gourmet warns about that as a problem. She also used buttermilk...

Millet/Rice Muffins (overnight soak)

|
I found these from Theresa Brown and adapted them for millet use. If you don't have a rice allergy, I will note where you need to change the recipe. These are a very versitile muffin, you can add zuchinni, carrot, fruit, etc. Get creative with the base and change it up a bit!
Makes 12-14

1 1/2 cups millet flour (or rice)
about 3/4 cup warm water
2 tablespoons whey (or lemon juice or vinegar)
1/2 cup coconut oil (or 1/4 cup for rice flour)
1/4 cup honey or maple syrup
2 eggs
1/2 teaspoon salt
1 teaspoon baking soda (1/2 tsp for rice)
1/2 teaspoon homemade baking powder

Zucchini Muffins

1 1/2 cups grated zucchini
1/4 teaspoon dried ginger

Carrot Muffins

1 1/2 cups finely grated carrots
1/2 teaspoon cinnamon

Fruit Muffins

1-1 1/2 cups blueberries, blackberries
or raspberries

Mix the first three ingredients and soak overnight. After soaking mix oil and honey thoroughly in a separate container. Add eggs, then salt, soda, powder, and any spices. Combine flour mix and egg mix with fruit or vegetable. Bake at 325 degrees for 25 minutes,or until a toothpick comes out clean.

Whole Wheat Biscuits and Pot Pie Crust

|
These are really versitile. I usually don't roll them out, I just do drop biscuits and it works fine!
2 cups spring whole wheat flour (white whole wheat flour)
1/2 tsp salt
4 tsp baking powder
3/4 cup buttermilk or heavy cream (not ultra-pasteurized)
1/2 cup butter melted

Mix all dry ingredients together in a bag or bowl and shake well to combine. Add in the butter and cut well. Add in the milk or cream and blend until well combined...don't over mix. Preheat an oven to 425 degrees. Drop biscuits by the spoonful on stoneware or sil-pated bake sheet and bake for 10-15 minutes.

This also can be used for the pot pie crust. If that is the case, split the dough in 2 and roll out into 2 9.5 inch in diameter circles.